
BuzzLog is the blog section of Buzz n Beat and every article or post published on BuzzLog is called a BuzzPost, a service mark of Buzz Media, Inc.
BuzzLog uses WordPress as its Content Management System, with a host of custom enhancements.
In this BuzzPost we’ll walk through each of the following steps and features:
- Accessing your Admin Panel.
- The required elements of a BuzzPost.
- Know your BuzzPost Editor.
- Basic and enhanced controls:
- Quick and easy Search Engine Optimization that ensures better indexing of your BuzzPost.
- Final steps and publication
Once you finish reading, if you have not used WordPress before then you will be able to write a perfect BuzzPost without stress and errors; if you are already comfortable with using WordPress then you will discover some useful enhanced features and controls.
Accessing your Admin Panel
You’re currently not logged in. If you’ve already signed up, please click here to login. If you’re not a member yet, we invite you to sign up and join Buzz n Beat. Once you’re logged in as a member, your dashboard icon will appear in the top menu next to the search icon as shown below.
![]()
If you would like to quickly publish a BuzzPost without SEO and a few other advance functionalities then please click Tell Your Story and then select the Publish a BuzzPost tab.
Click the dashboard icon, it will open your BuzzLog Admin Panel in a new tab.
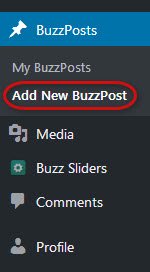
Click the Add New BuzzPost link under the BuzzPosts Menu. It will open the BuzzPost Editor along with all the related Controls.
The required elements of a BuzzPost
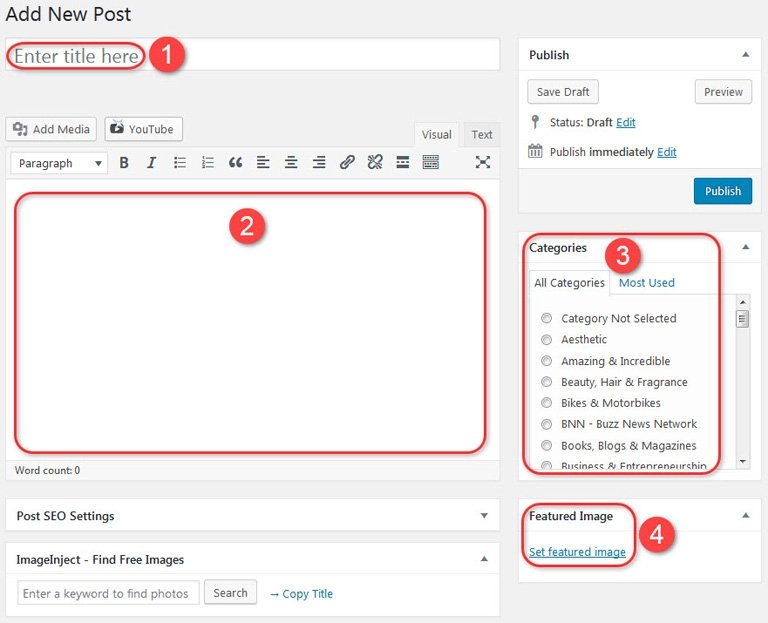
Let’s see what are the basic elements that make a BuzzPost. Each of these elements is required. As we briefly walkthrough the available controls & functionalities, we’ll also talk about how to optimize each element.
- Enter the title of your BuzzPost. There is no character limit but keeping it between 50 – 80 characters, including spaces, makes a better title.
- Remember, that the BuzzPost Title is your first contact with your visitor. That’s how you say Hi as a BuzzLogger. Failing to grab a visitor’s attention at this initial contact means losing your audience and as a successful BuzzLogger that’s certainly not a desirable option. From idea to presentation, think and craft your BuzzPost Title with the goal that you have to turn your visitor into your reader.
- Incorporating one or more of the following elements will help you write a powerful title:
- Create a WOW that grabs your reader’s attention.
- Send an emotional appeal while not playing with your reader’s sentiments.
- Arouse curiosity.
- However, always stay relevant and make sure that your BuzzPost delivers well on its title.
You write the body of your BuzzPost in the Editor. You can include any combination of the following types of content:
- Text.
- Text hyperlinks.
- Images.
- Image hyperlinks.
- Image galleries.
- BuzzSliders with or without optional title and hyperlink for each image . Please read How To Create Stunning BuzzSliders For Your BuzzCasts & BuzzPosts for step by step instructions.
- YouTube videos:
- To insert a YouTube video just insert its URL in the Editor.
- To search videos by keywords and then insert them in the BuzzPost please see these instructions
Know your BuzzPost Editor
- As you work in the Editor, you can turn it into a Visual Editor or an HTML Editor. To change the view, please use the Visual and Text (HTML) tabs as shown in the screenshot below.


- While working in the editor, especially on smaller screens, you might want to remove the left and right columns to make more room for the editor and also to work in a distraction free environment. You can use the Distraction Free Mode icon as shown in the following screenshot to turn this feature ON and OFF. Please keep in mind that the distraction free mode will automatically turn off when you click outside of the editor. However, clicking again inside the editor will resume the distraction free session.

- While you work in the Visual Editor, some of the editorial controls are hidden by default. To display all the controls please use the Toggle icon as shown in the screenshot below.

- Please select the most appropriate category for your BuzzPost.
- In case you omit the selection of category, your BuzzPost will be saved but it’ll not be published on the frontend.
- To assign a category later, please click My BuzzPosts under the BuzzPosts menu and then click the required BuzzPost title in the list. It’ll open your BuzzPost in edit mode. Select a category and hit Publish.
- If you do not correct your mistake within 24 hours then the system may delete your post to keep the backend free of unwanted content.
- Featured image is one of the most important elements of your BuzzPost. It appears on the archive page/BuzzPost list along with the BuzzPost title and excerpt.
- It’s natural that visuals get more attention. Just as a catchy title can make a visitor read the whole BuzzPost, an attractive featured image can make a vsitor read the title.
- Take some time to find an image that’s relevant and attractive.
- Please remember that omission to add a featured image doesn’t just give your BuzzPost a very poor impression; it can actually render your BuzzPost almost un-noticeable.
Basic and enhanced controls to find and incorporate images and videos in your BuzzPost
As you work in the BuzzPost Editor, it’s important to know the available controls and functionalities. Let’s see how you can find and create visual assets and incorporate them in your BuzzPosts.
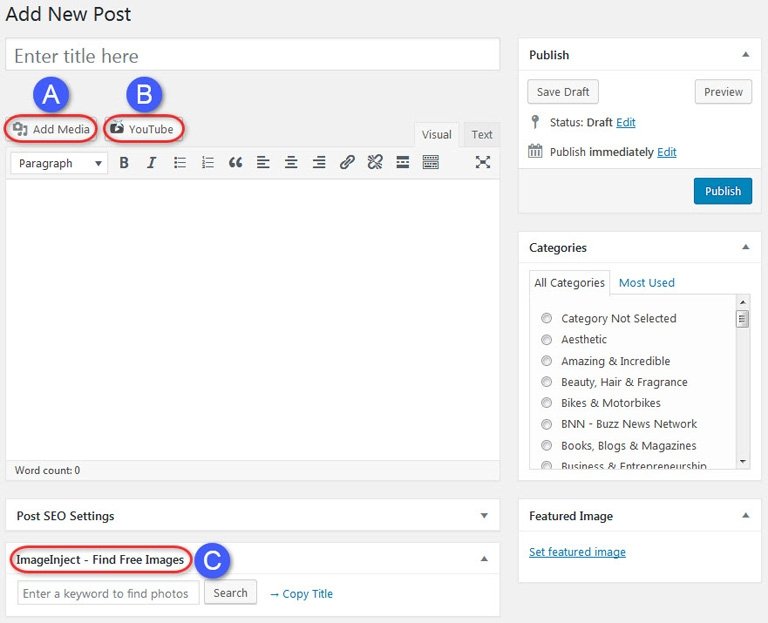
- Use this button to select, upload and insert images in your BuzzPost.
- Clicking Add Media button will take you to the Media Library. Here you can select an existing image or click the Upload Files tab on the top to upload new images.
- Once on the Upload Files screen, you can click the Select Files button to upload a single image of just drag and drop multiple files onto the Upload Files screen.
- To create an image gallery, please click the Create Gallery link in the left column.
- Click Media Library tab on the top to select from the existing images.
- Click Upload Files tab on the top to upload new images.
- To select multiple images in sequence, press and hold the SHIFT key and then click the first image and the last image that you want to select.
- To select multiple images that are not in sequence, press and hold the CTRL key and click the desired images one by one.
- Once you’ve selected all the desired images, click the Create a New Gallery button in the bottom right of the screen.
- On the next screen you can remove any image by clicking the “X” icon and drag and drop the images to change their order.
- Once you’ve finalized the images and their order, click the Insert Gallery button in the bottom right of the screen. It’ll take you back to the Edit Post page and insert the image gallery in the Post Editor.
- To remove or alter the newly inserted gallery, click any image in the gallery, a border will appear around the gallery and the action buttons will popup. Click the “X” icon to delete the gallery or the “pencil” icon to make changes to the gallery.
Use this button to search YouTube videos by keyword. Once you click the button the user interface is quite intuitive and self-explanatory. In addition to searching the videos, you can also customize many settings including the player dimensions etc.
Use this button to search images on Pixabay and Flickr. You can use the images displayed in the search results even for commercial content without need for attribution.
The search interface is very intuitive and self-explanatory. You can insert an image in the body of BuzzPost or add it as the Featured Image.
Top
Quick and easy Search Engine Optimization that ensures better indexing of your BuzzPost
You’ve creative ideas and a whole world of knowledge and information. Your expression and presentation mesmerizes your reader. However, when it comes to search engines, they are unable to appreciate the true greatness of your content because, unlike humans, their pseudo brains are just a bunch of algorithms. They can sniff only what’s built into their logic. Here comes Search Engine Optimization. In order for proper indexing and ranking, your content must be “appealing” to the search engine’s logic.
Real SEO depends on how the primary keywords of your topic naturally occur in the content of your BuzzPost. Following tips can help you write a highly SEO optimized BuzzPost:
- Do use the primary keyword in the BuzzPost Title.
- Make sure that the primary keyword does appear in the first paragraph and then it naturally repeats throughout the content.
- If you use images or other media in your BuzzPost then their file names do matter. If you’re writing about cars and you use a picture of cars then its better SEO practice to name it cars.jpg instead of 1.jpg etc.
- Never spam your BuzzPost with keywords. Today’s search engines are intelligent enough to understand what’s going on and they are fully equipped to punish for bad practice.
- Once you’ve thoroughly reviewed your BuzzPost for SEO, now it’s time to write an SEO friendly Title and Description just for the search engines. For this purpose, BuzzPost Editor provides you an enhanced custom functionality with a very intuitive and user-friendly interface.
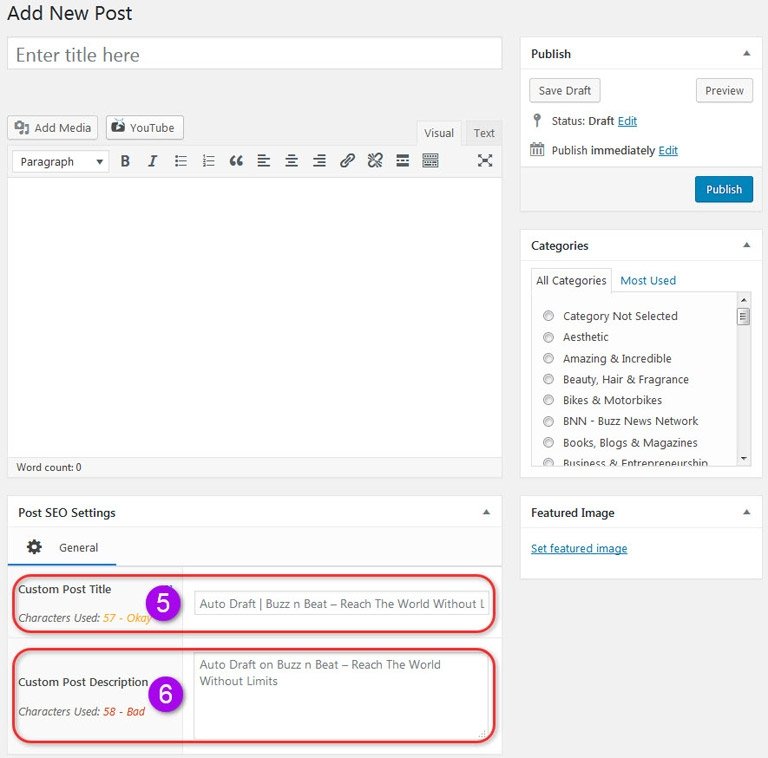
- Search engines display only a limited number of characters as the content title due to their formatting and space limitations. Each search engine has its own rules but you can take 50 characters including spaces as a good fit-all length for title.
- Under BuzzPost Title we said that 50 – 80 characters including spaces makes a good title. However, if a search engine displays only the first 50 out of 80 characters of a title then, in certain situations, it can be catastrophic for that post. The trimmed title may not make a meaningful statement at all.
- What’s the solution? Certainly, we need two different titles. One for humans and the other for search engines that they can display in the search results without compromising the message and meanings conveyed by the title. This second title is also sometimes called the SEO Title.
- Please condense and summarize your title to fit it in a smaller sentence without losing its message and appeal. However, while doing that you’ll probably face a situation that might be confusing. The SEO Title textbox will automatically annex the site title “Buzz n Beat – Reach The World Without Limits” at the end of your SEO Title, that’s 44 characters by itself. Relax, there is nothing to worry about. Write an attractive title and try to fit it in 39/40 characters. If a search engine displays 50/51 characters for the title then it’ll still display the name of the site, Buzz n Beat.
- The search engines display the first line or two as the description of the search result entry. However, the starting lines may not be able to convey the gist of your BuzzPost. It’s therefore a good idea to write a concise description that gives a true and complete overview of the post in a way that the readers is tempted to read the full post.
- Please keep the description around 150 characters.
Final steps and publication
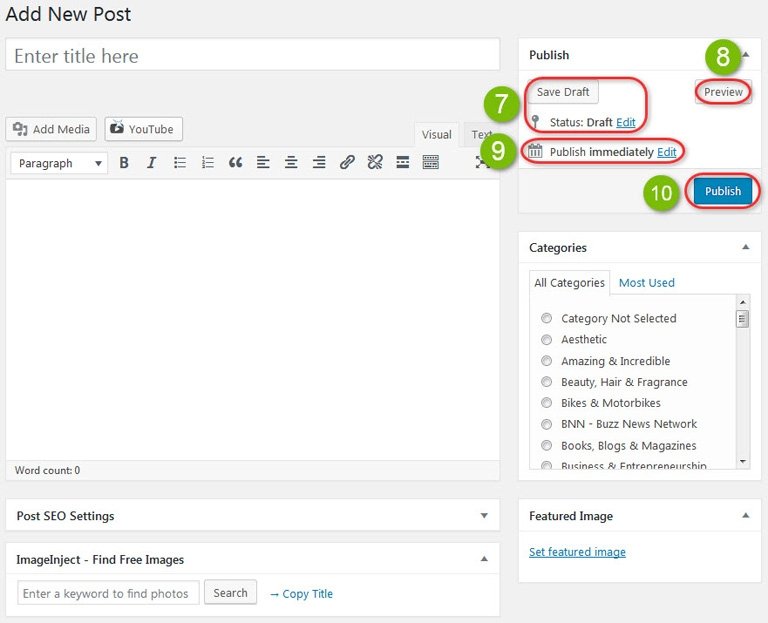
- If you do not plan to complete your BuzzPost in one session then the Save Draft button is here to help you.
- You can change the status of your BuzzPost. Click the Edit link next to Status, select an appropriate status from the dropdown and click OK. Once the new status has been saved, the Publish button (control 10 in the screenshot) will change to Update. Click the update button to finalize the change of status. As the status update is finalized, the Save Status button (control 7 in the screenshot) will display the new status.
- Each time you make any changes to your BuzzPost you can use this button to save the changes while keeping the current status.
While writing your BuzzPost you can use this button to preview your BuzzPost as it’ll appear on the frontend.
- Once your BuzzPost is complete, you can publish it immediately or schedule it for publication at a later date and time.
- If you’re going to publish immediately then just leave these settings intact.
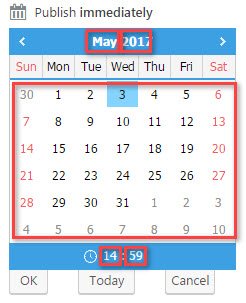
- Please use the Edit link to set the publication schedule. Keep in mind that you’ll need to select the hours and minutes in addition to the year, month and date of publication.
- Once you’ve decided the time of publication, please use this button to publish your BuzzPost.
- If you have selected “Publish Immediately” then your BuzzPost will instantly appear on the frontend.
- If you’ve scheduled your BuzzPost for a future time then it’ll automatically publish at the scheduled date and time.
We’re confident that your BuzzPost will get the buzz it deserves.
Happy blogging BuzzLogging!
- How To Manage Your Author Profile - January 1, 2017
- How To Create Stunning BuzzSliders For Your BuzzCasts & BuzzPosts - January 1, 2017
- How To BuzzCast On BuzzChannels – Step by Step - January 1, 2017
